
This can be done by adding rules for each checkbox to validate if the checkbox contains a true value and then set the style for the item. As you can imagine having about 4000 checkboxes this would be a very time consuming job, and very ugly. Below I will show you what I came up with to fix this and make it basically run on its own whenever you need a checkbox to be required, I’ve also included dropdowns and radio button lists.
Step 1:
First we need to set the required fields on the view. For doing this I decided to use the ToolTip field on the controls. I will be showing grouped items, normal items and dropdowns all together.
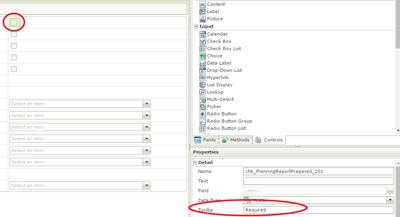
As you can see I’m setting the Tooltip to “Required” and you can do the exact same thing for Radio Button lists and dropdowns. I’ve added some other nice feature where you can have a group validation, where at least one item should be selected. In order to do this, I’ve used “Required1” as a tooltip item. See below image.

As you can see I’m using Required1 for the group of items, so each one of them needs a Tooltip of Required1. This will group them together and at least one of these items needs to be selected. In order to display this group item in K2 blackpearl as required there is one more thing you need, and that is a label on the page containing a Tooltip with Required1. Keep in mind this is only for grouping and the other items will highlight the required control.

As you can see from the above image I selected the “Please select at least one item” label to be the validation message for the group items.
Step 2:
Now that we did the setup of all required items for this view we need to check for these items using jQuery. As most forms will have a heading and footer, you can add script to one of the generic views you will use all over you project. So in order to run the JavaScript on a K2 blackpearl smart form we need to add it as a data label. Because the JavaScript/jQuery is a few lines, we need to add it as an expression on the label.

Now create an expression and add the code below the following image to your expression. Make sure your label settings are the same as the above image.

And now for the final script that does some magic in the background.
<script type="text/javascript"> jQuery(document).ready(function () { jQuery("a[name='ButtonNext']").click(function () { var valid = true; var validGroupCount = 0; var Required1Group = false; jQuery("label[title='Required']").each(function () { if (jQuery(this).is(":visible") && !jQuery(this).hasClass("disabled")) { if (!jQuery(this).hasClass("checked")) { jQuery(this).find("span:first").attr("style", "border:solid 1px; color:red;"); valid = false; } else { jQuery(this).find("span:first").removeAttr("style"); } } }); jQuery("span[title='Required']").each(function () { if (jQuery(this).is(":visible") && !jQuery(this).hasClass("disabled")) { if (!jQuery(this).hasClass("checked")) { jQuery(this).attr("style", "color:red;"); valid = false; } else { jQuery(this).attr("style", "color:#3f7f00;"); } } }); jQuery("div[title='Required']").each(function () { if (jQuery(this).is(":visible") && !jQuery(this).hasClass("disabled")) { if (jQuery(this).hasClass("watermark")) { jQuery(this).addClass("invalid"); valid = false; } else { jQuery(this).removeClass("invalid"); } if (jQuery(this).hasClass("calendar-control")) { if (jQuery(this).find(".input-control-watermark").is(":visible")) { jQuery(this).addClass("invalid"); valid = false; } else { jQuery(this).removeClass("invalid"); } } if (jQuery(this).hasClass("control-group-container")) { if (jQuery(this).find(".checked").length == 0) { jQuery(this).addClass("invalid"); valid = false; } else { jQuery(this).removeClass("invalid"); } } } }); jQuery("div[title='Required1']").each(function () { if (jQuery(this).is(":visible") && !jQuery(this).hasClass("disabled")) { Required1Group = true; if (!jQuery(this).hasClass("watermark")) { validGroupCount++; } } }); if (Required1Group) { if (validGroupCount == 0) { jQuery("span[title='Required1']").attr("style", "color:red;"); valid = false; } else { jQuery("span[title='Required1']").removeAttr("style"); } } if (!valid) { jQuery("a[name='ShowValidation']").click(); } return valid; }); }); </script> |
So you will need to make two changes on this script to make it work for you. First thing you will have to do is set the button that will be used to submit the form. In my case it is “ButtonNext”. So in the first line change ButtonNext to whatever you are using. This will basically allow the browser to run your code first and then execute the K2 blackpearl code.
The second item you will have to change is the line at the bottom containing “a[name=’ShowValidation’]”. You can either remove this line, as it basically calls a button I’ve added on the header form to show a nice message to the user. So if you don’t have this button remove this line and once you click on next it will show the validation issues for the page.
Hope this helps and please let me know if you have any questions.